Note: This tutorial was written by my friend ChenNux in markdown format. I translated it to English as a Web page. For the original version of this tutorial: https://github.com/Chennux/arch-tuto-installation.
In this small guide, I will detail the installation of Arch Linux with GNOME, Plasma, XFCE, MATE, Cinnamon and LXQt. The installed system will contain enough stuff to be usable.
For practical reasons, I do not cover the installation of devices like printers, scanners or webcams. I redirect you to the wiki: https://wiki.archlinux.org for this kind of manipulation.
Note: This tutorial is voluntarily simplified. It will allow you to see how to install Arch Linux in single boot. Then, if there are specificities linked to your hardware, it's on a per case basis that you must look and read carefully the above wiki. If you want to install Arch Linux in dual boot with Microsoft Windows, it's out of the scope of this document.
Thanks to Ewolnux, Xarkam, Frédéric Sierra, Ludovic Riand, Vincent Manillier, Thomas Pawlowski, Igor Milhit, André Ray, Nicolas, Charles Monzat, SuperMario S, Angristan, Simon B, r33int, Mozzi, Kevin Dubrulle, Christophe Leloup, Nornort and Quentin Bihet pour their tips and remarks. And thanks above all to Frédéric Béziès for writing the first versions of this document, available under license CC-BY-SA 4.0.
Installing Arch Linux is like building a house. We start with the base, and we add the walls and the rest after. The ISO image I used is the archlinux-2024.08.01-x86_64.iso, uploaded in the beginning of August 2024.
The virtual machine is a VM to which I added a 50 GB virtual drive. Some points specific to an install in VirtualBox or VMware are indicated.
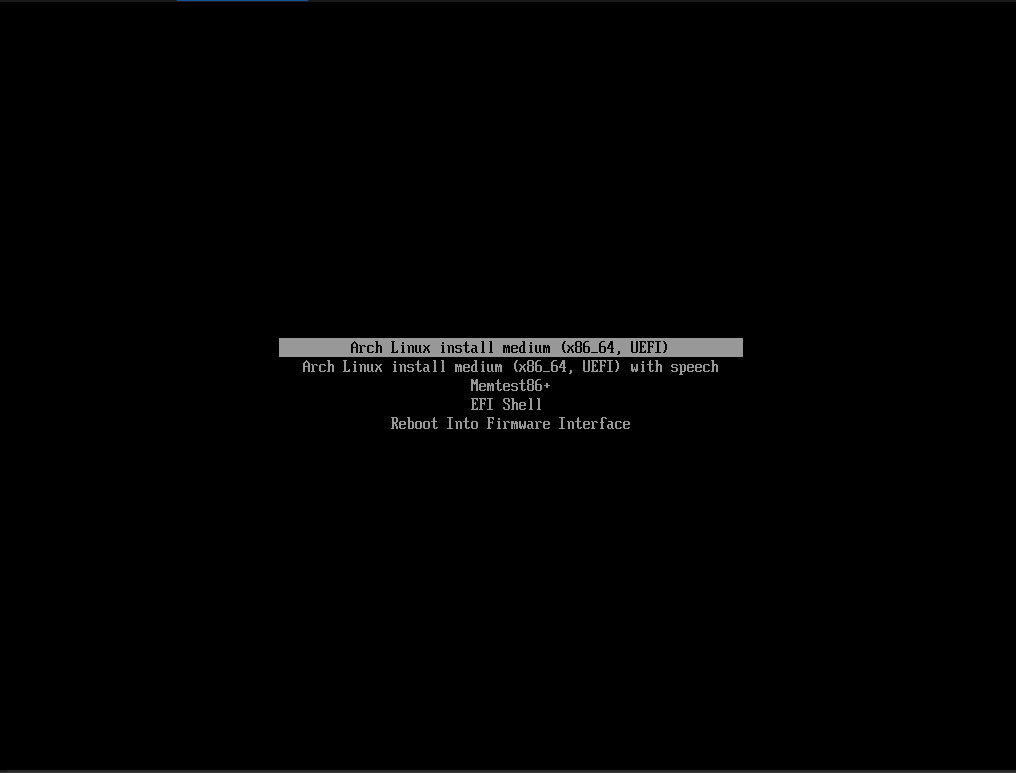
Note: For clarity reasons, only the installation in UEFI mode will be covered in this new version of the tutorial. If you are installing Arch Linux in a virtual machine, remember to activate UEFI in the VM's settings. If you do not have UEFI, I invite you to read the partitioning instructions and the bootloader installation instructions in the dedicated annex.
The first thing to do is to load the correct keyboard, the US keyboard in this case:
loadkeys us
We check if the Internet connection is working:
ping -c 5 archlinux.org
Note: if you want to use a Wi-Fi connection, a proxy server or SSH to install, I invite you to read the dedicated annex.
If everything is functional, we can move on to partitioning. Here is the screen that allows us to boot in UEFI mode:
If you are not familiar with partitioning a drive, it is recommended to use a LiveCD like GParted, available at the following address: http://gparted.org/download.php.
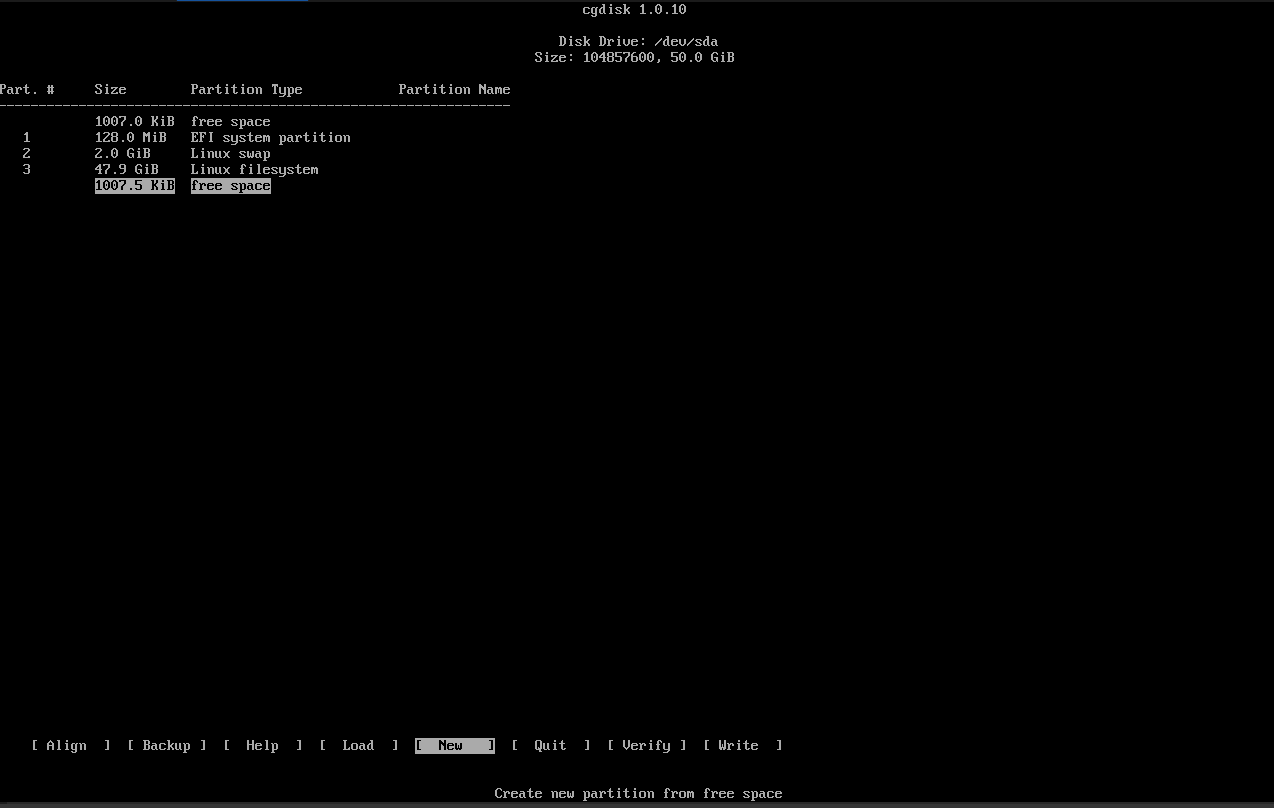
You must remember that for an UEFI installation, a GPT partition table is mandatory. If you didn't use GParted, you must use the cgdisk tool. Before, to know which disk to partition, you can use the fdisk -l command.
| Partition | Mount point | Size | Reference | Filesystem |
|---|---|---|---|---|
| /dev/sda1 | /boot/efi | 1 GB | EF00 | FAT32 |
| /dev/sda2 | RAM size or more - With more than 8 GB of RAM, 8 GB is recommended | 8200 | swap | |
| /dev/sda3 | / and /home | Rest of the drive | 8300 | BTRFS |
Here is a screenshot of what the partitioning in cgdisk looks like:
Now we format the partitions:
mkfs.fat -F32 /dev/sda1

        mkfs.btrfs /dev/sda3
We format and activate the swap partition:
mkswap /dev/sda2

        swapon /dev/sda2
To create the BTRFS subvolumes:
mount /dev/sda3 /mnt

            btrfs subvolume create /mnt/@ /mnt/@home

        umount /mnt
And for the mount points:
mount -o compress=zstd,subvol=@ /dev/sda3 /mnt

            mkdir /mnt/{boot,boot/efi,home}

            mount -o compress=zstd,subvol=@home /dev/sda3 /mnt/home

            mount /dev/sda1 /mnt/boot/efi
Note: The compress=zstd option compresses the BTRFS partitions with the ZSTD algorithm, which allows to win in disk space but also in disk life.
After partitioning the drive and mounting the partitions, we can move on to the serious stuff, which is installing the base of our system. The best mirrors have been automatically chosen by the Reflector tool upon boot of the installation media. The second line adds some tools very useful to have from the beginning. After that we can start the actual installation.
pacstrap /mnt base linux linux-{headers,firmware} base-devel pacman-contrib man-{db,pages} texinfo btrfs-progs

            pacstrap /mnt zip unzip p7zip nano mc alsa-utils mtools dosfstools lsb-release exfatprogs bash-completion
If you want a long term support kernel, you must replace on the first pacstrap line linux with linux-lts and linux-headers with linux-lts-headers.
Note: exfatprogs, replacing exfat-utils, is useful for supporting large capacity SD cards. Also, since NTFS support is now included in the kernel, we do not need to install ntfs-3g anymore. Thanks to Ada for the precision.
You can also replace nano with vim if you prefer the latter.
If you are on a laptop, adding tlp is recommended. More info on this page: https://wiki.archlinux.org/index.php/TLP
If you want to add support for your CPU's microcodes, add the amd-ucode package (for AMD) or intel-ucode package (for Intel). GRUB will detect them automatically.
Now that the base system is installed, we generate the /etc/fstab file which lists the partitions:
genfstab -U /mnt >> /mnt/etc/fstab
We now move on to the setup of the system we just installed, we now need to enter it. We use the following command:
arch-chroot /mnt
Before going further, here are some useful informations. This is regarding English-speaking countries like the US, Canada, United Kingdom, Australia or Ireland.
We will after this create some files which will ask for precise values. Here are the main ones here:
| Country | Locale (LANG) | Keyboard (KEYMAP) |
|---|---|---|
| Australia | en_AU.UTF-8 | us |
| Canada | en_CA.UTF-8 | ca |
| Ireland | en_IE.UTF-8 | ie |
| United Kingdom | en_GB.UTF-8 | uk |
| United States | en_US.UTF-8 | us |
To have the correct keyboard in text mode, create the /etc/vconsole.conf file. We can modify it later if needed.
KEYMAP=us

        FONT=eurlatgr
To have the correct locale, the /etc/locale.conf file must have the correct value for LANG. For someone in the United States:
LANG=en_US.UTF-8

        LC_COLLATE=C
We must check that the en_US.UTF-8 line in the /etc/locale.gen file isn't commented out. We will now generate the translations:
locale-gen
We can set the locale for the current session, to set depending on your country:
export LANG=en_US.UTF-8
The hostname? It's set in the /etc/hostname file. Type the name on the first line. For example: chen-archlinux. To replace with the name of the machine of course.
The timezone? Only one step. Let's take as an example an installation with the US Eastern timezone. We create a symbolic link:
ln -sf /usr/share/zoneinfo/US/Eastern /etc/localtime
If you do not use Windows on the machine, it is recommended to set the BIOS clock to UTC. If you use Microsoft Windows, skip this step.
hwclock --systohc --utc
It is now time to install the bootloader. I use GRUB2. The os-prober package is required if you are dual booting.
The second line allows to check a mount point and to activate it if needed. The third one installs GRUB. Thanks to Kevin Dubrulle for the addition.
pacman -Syy grub os-prober efibootmgr grub-btrfs

            mount | grep efivars &> /dev/null || mount -t efivarfs efivarfs /sys/firmware/efi/efivars

            grub-install --target=x86_64-efi --efi-directory=/boot/efi --bootloader-id=arch_grub --recheck
To avoid boot issues after, especially in VirtualBox, it is recommended to add the following commands:
mkdir -p /boot/efi/EFI/boot

            cp /boot/efi/EFI/arch_grub/grubx64.efi /boot/efi/EFI/boot/bootx64.efi
After installing GRUB, we generate its configuration file:
grub-mkconfig -o /boot/grub/grub.cfg
Note: Simon B made me realize that if you are dual booting with another GNU/Linux distribution, you do not need to install a bootloader on Arch Linux. You only need to run a command like update-grub in the other distribution.
Of course, no error must appear. We give a password to the root account:
passwd
For the network, installing and activating NetworkManager is a good idea. You can install it like follows:
pacman -S networkmanager

            systemctl enable NetworkManager
If you want to use Bluetooth:
pacman -S bluez

            systemctl enable bluetooth
Note: If you're not using NetworkManager, I direct you to this page of the Arch Wiki which will help you in this task: https://wiki.archlinux.org/index.php/Netctl. You must then install the netctl package.
Note 2: netctl and NetworkManager conflict and must not be used at the same time. One simple rule: only one network connection manager at the time!
Note 3: If you are using Wi-Fi networks directly with NetworkManager and its applet, the gnome-keyring package is required. Thanks to Vincent Manillier for the info.
If you use apps like Wine or Steam (which require some 32-bit libraries), you must uncomment (remove the #) from the beginning of the following lines in /etc/pacman.conf:
#[multilib]

            #Include = /etc/pacman.d/mirrorlist
Note 4 (after a suggestion of Lomig): In the same file, you can uncomment or add these options in the "#Misc options" section to make Pacman more friendly:
Color

            CheckSpace

            VerbosePkgLists

            ParallelDownloads = 5

            ILoveCandy
We can now leave everything, unmount the partitions properly and reboot:
exit

            umount -R /mnt

            reboot
There we go, we can reboot. We must remove the installation media to avoid any issues on next boot. We will move on with the rest, largely less boring!
We now move on to the more interesting part, installing the graphical environment. There are common steps to all environments.
Once the system booted, we login as root. Since I installed NetworkManager at the previous step, the network works directly. Extra steps are required if you are using a Wi-Fi network.
The base system in place, we launch alsamixer with the command of the same name, to configure the sound levels:
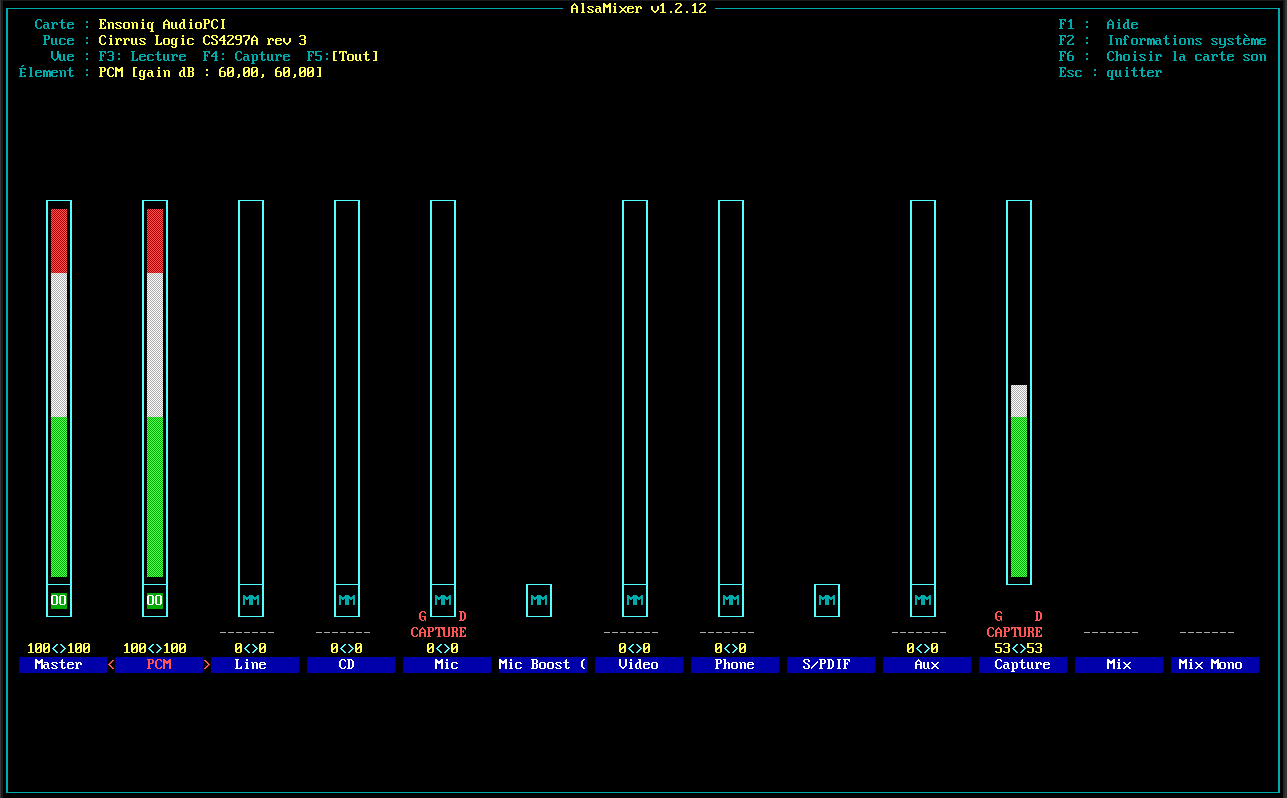
Once everything set up, to keep the settings as set, we just need to type:
alsactl store
We are in the multimedia? Let's stay in it. We will install all of the gstreamer plugins which will give us access to multimedia files once GNOME launched. You will need to replace pacman -S with sudo pacman -S when you will use your standard user account later.
Thanks to Adrien from Linuxtricks for helping me reduce the length of the command line :)
pacman -S gst-plugins-{base,good,bad,ugly} gst-libav
gst-libav? It supports everything x264 and related.
Let's now move on to the installation of Xorg:
Note: There is no space between the - and the { near the end of the next command.
pacman -S xorg-{server,xinit,apps} xdg-user-dirs
For the trackpad of certain laptops, you might need to add the xf86-input-synaptics package.
We must after that choose the driver for the graphics processor. Here are the main drivers, knowing that the xf86-video-vesa package supports a very large amount of graphics processors, including some not listed in the following table. If in doubt: https://wiki.archlinux.org/index.php/Xorg#Driver_installation
For NVIDIA, it's a burden when it comes to proprietary drivers. The simplest is to refer yourself to the Arch Wiki: https://wiki.archlinux.org/index.php/NVIDIA. And if you have the Optimus technology: https://wiki.archlinux.org/index.php/NVIDIA_Optimus
Note: It is recommended in most case to install no driver for Intel graphics cards: https://wiki.archlinux.org/index.php/Intel_graphics#Installation
| Graphics processor | Open source drivers | Proprietary drivers (if available) |
|---|---|---|
| AMD | xf86-video-ati | |
| xf86-video-amdgpu | AMDGPU-PRO (see the Arch Wiki) | |
| Intel | xf86-video-intel | |
| NVIDIA | xf86-video-nouveau | nvidia or nvidia-lts (see the Arch Wiki for the version to install depending on your GPU) |
| VMware / VirtualBox | xf86-video-vmware | |
| Universal | xf86-video-vesa |
If you are doing an installation in VirtualBox, you need two packages: the guest additions and the kernel modules required for them. What gives us:
pacman -S virtualbox-guest-utils
Now you gotta enable the required service:
systemctl enable --now vboxservice
If you are using VMware, you also need to install the VMware Tools:
pacman -S xf86-video-vmware open-vm-tools
You also need to enable the appropriate services:
systemctl enable --now {vmtoolsd,vmware-vmblock-fuse}.service
Note: If someday you are installing VirtualBox on a real machine, I redirect you to this page of the Arch Wiki: https://wiki.archlinux.org/title/VirtualBox
Note: To install VMware on a real machine this page of the Arch Wiki is very useful: https://wiki.archlinux.org/index.php/VMware
After that we are going to install the fonts. Here is the command line for the main ones, the freetype2 package bringing some improvements. Thanks to Angristan for the suggestion. The Noto fonts support the majority of Unicode characters (emojis, asian characters, math symbols...).
pacman -S ttf-{bitstream-vera,liberation,dejavu} gnu-free-fonts freetype2 noto-fonts{,-extra,-cjk,-emoji}
Note: For the Microsoft fonts, the ttf-ms-fonts package, they are in the AUR, so you need to use an AUR helper like paru to install them. If you want compatibility with documents of the more recent versions of Microsoft Office, you can add ttf-carlito and ttf-caladea (available in the Arch Linux repositories).
We will add a few tools, to avoid having an empty environment on the first boot.
We install the CUPS printer service and the maximum of drivers for the printers. python-pyqt5 is a dependency for the hplip configuration interface, which is only useful for a recent HP or Brother printer.
pacman -S cups hplip python-pyqt5 foomatic-db{,-ppds,-gutenprint-ppds,-nonfree,-nonfree-ppds} gutenprint
We will now install a few software useful everyday: Firefox for the Web browser (with the ad blocker), LibreOffice for the office suite (with the Hunspell spelling checker), GIMP for photo editing and Timeshift for the system snapshots:
pacman -S firefox{,-ublock-origin} libreoffice-fresh hunspell-en_us gimp gimp-help-en timeshift
Of course, many more software are available in the Arch Linux repositories.
After, we create a standard user with the following commands:
useradd -m -g wheel -c 'Full Name' -s /bin/bash username

        passwd username
Before finishing, we will set up sudo by using visudo which modifies /etc/sudoers. We only need to change one line to have the full rights on the machine as a standard user. Specify the editor you want to use while running the command.
EDITOR="nano" visudo
You must go, using the Down arrow, to the line:
#Uncomment to allow members of group wheel to execute any command
And remove the # at the line that follows.
Small bonus: Installing paru to complement Pacman
As a reminder, Paru is an AUR helper, which allows installing packages from the AUR more easily.
Note: Commands to run as a standard user.
sudo pacman -S git

        git clone https://aur.archlinux.org/paru

        cd paru

        makepkg -sri
To have the right keyboard after launching GDM, SDDM or LightDM (depending on your desktop environment), here is a small command to run (to adjust depending on your keyboard layout):
sudo localectl set-x11-keymap us
Since systemd is used, here is the list of services to enable (with a quick explanation), which will be the same for all desktop environments:
sudo -i

            systemctl enable avahi-{daemon,dnsconfd} > *CUPS dependencies*

            systemctl enable cups > *CUPS for the printers*

            timedatectl set-ntp true > *For network time synchronisation*

            systemctl enable systemd-oomd > *Automatically kills processes that take too much resources*

            systemctl enable fstrim.timer > *SSD optimization (useless on HDDs)*

            exit
Note: Commands to run as a standard user.
We start by installing GNOME's packages. The gnome-software set is now installed with the gnome metapackage. unoconv allows to see previews of documents in GNOME Documents.
sudo pacman -S gnome gnome-extra system-config-printer shotwell rhythmbox unoconv
If you want to add MTP support (for devices running Android for example), add the mtpfs package. The installation of GNOME is now complete.
After, we launch GDM:
sudo systemctl start gdm
If everything goes well, we enable it on boot.
sudo systemctl enable gdm
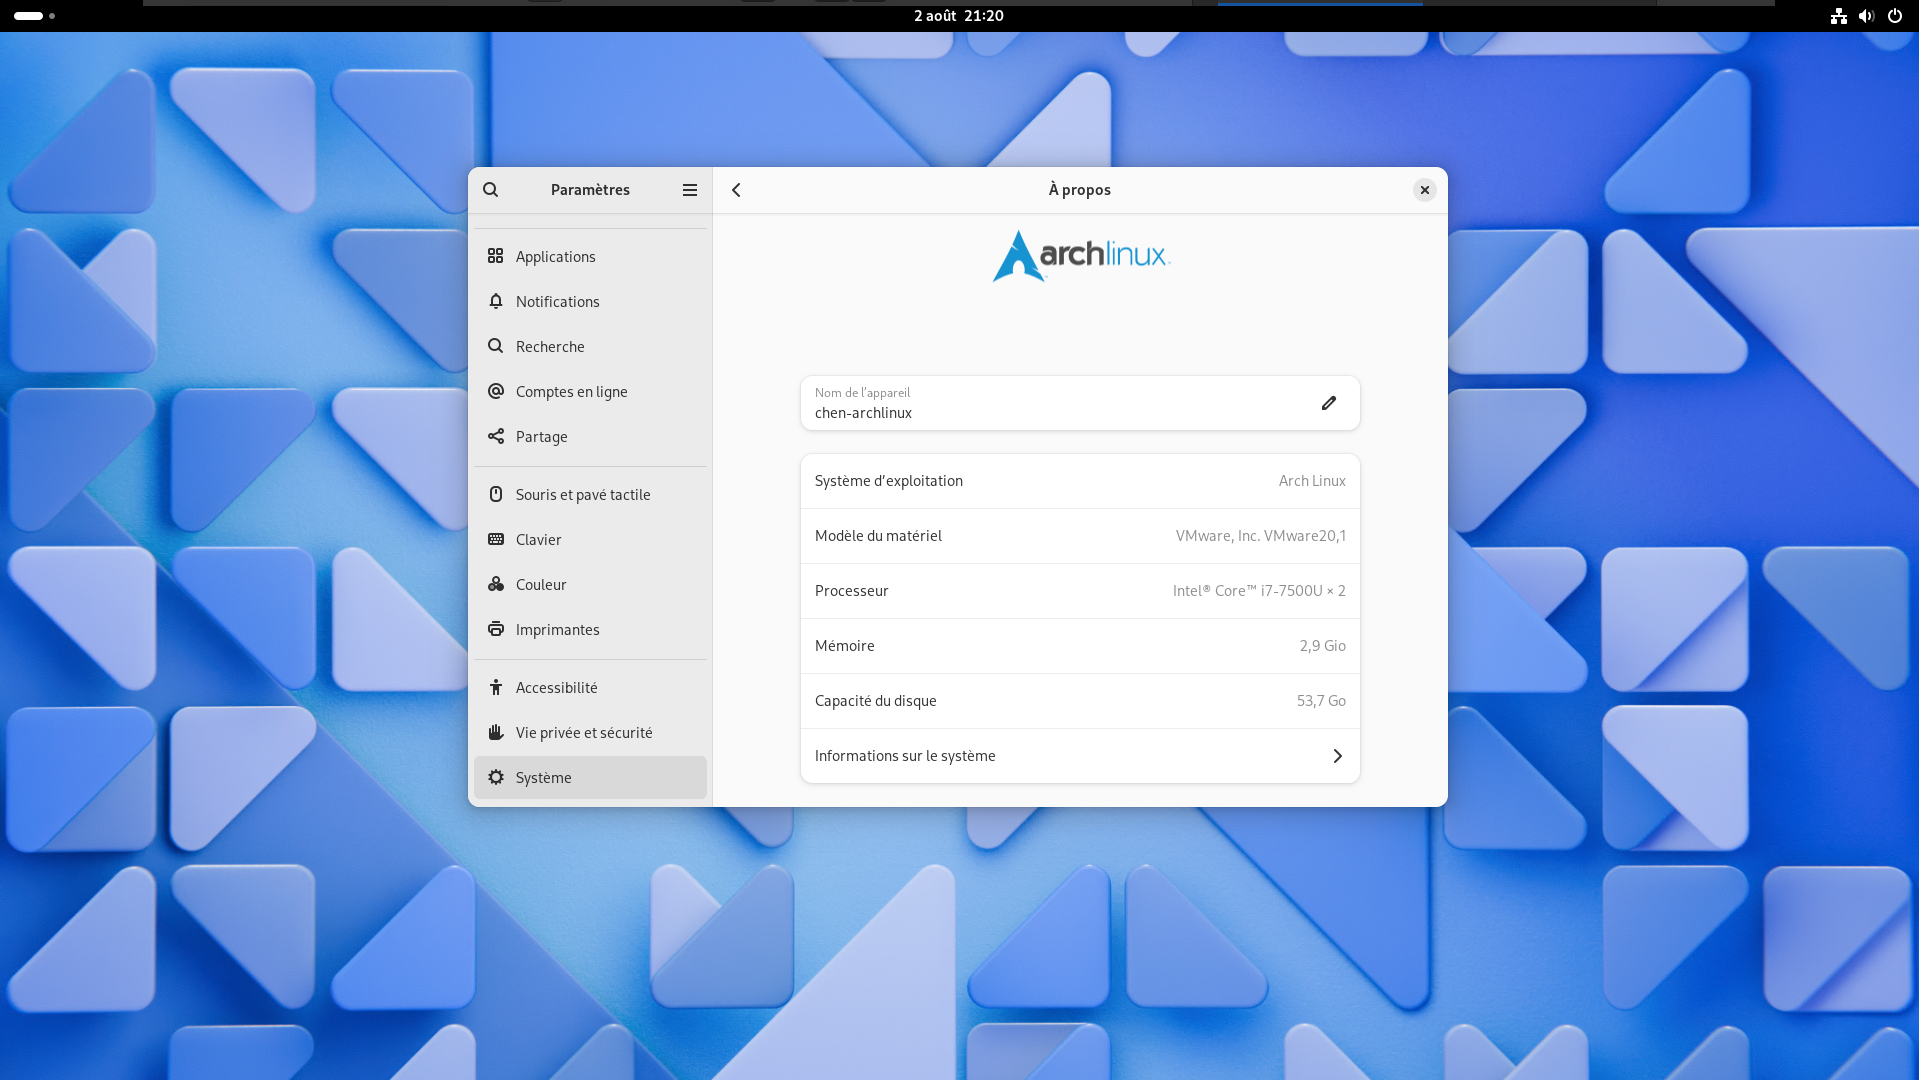
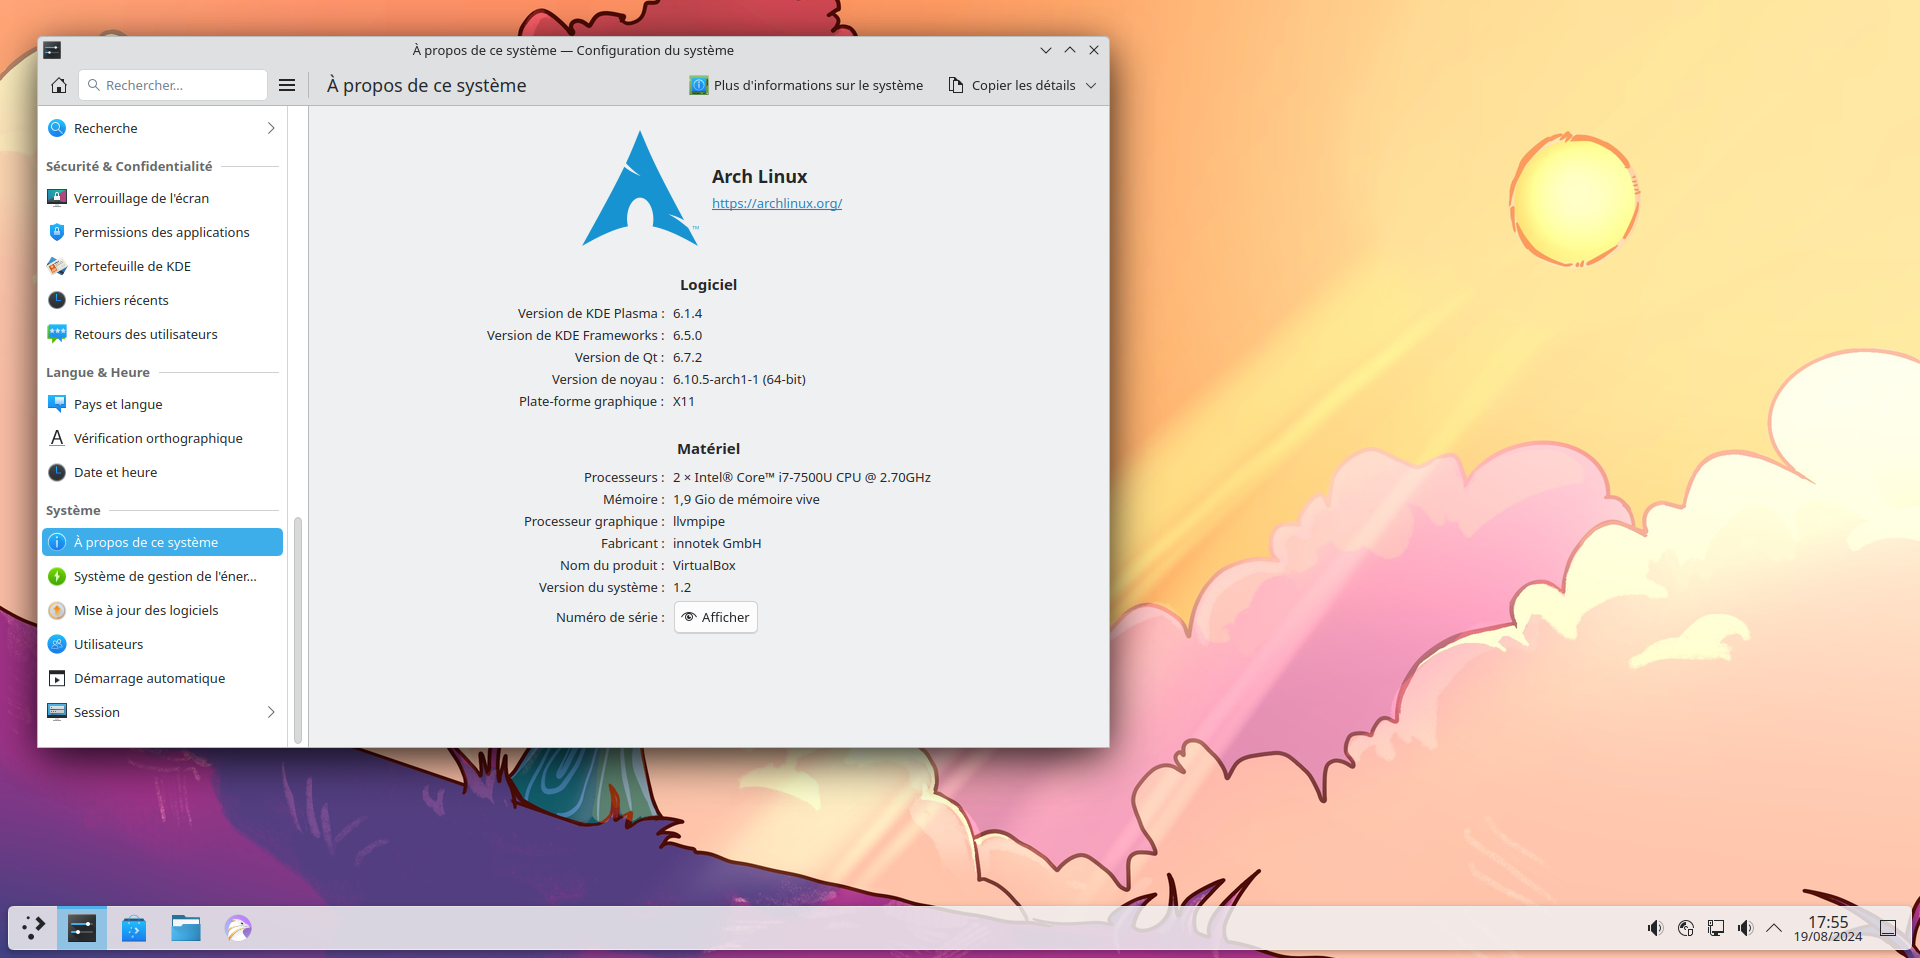
We must make sure that the keyboard is properly set up. This can be done in the GNOME Settings. To finish here is a screenshot of the GNOME Shell:
To use Discover with the Arch Linux repositories, packagekit-qt5 is required. The libappindicator-gtk{2,3} packages allow to better support the notifications of GTK+ applications. Don't forget to select the tesseract-data-eng package (used by the Skanpage application) if you are prompted for it.
Note: If you do not want to install all of KDE applications, know that there are smaller package groups depending on the app categories: kde-accessibility, kde-multimedia...
The installation goes like follows:
sudo pacman -S plasma kde-applications digikam packagekit-qt5 libappindicator-gtk{2,3}
After, we launch SDDM:
sudo systemctl start sddm
If everything goes well, we can use, to enable it on boot:
sudo systemctl enable sddm
If you are getting graphical issues, often seen in VirtualBox, try to login in a X11 session instead of Wayland (now the default choice).
For simplicity reasons, I decided to regroup in this same section these 3 desktop environments for which the installation process is pretty similar.
Note: If you need to manage devices using MTP (Android tablets for example) you need to add two packages: gvfs-mtp and mtpfs. If you want all of the gvfs plugins (thanks to SuperMarioS for the command line):
sudo pacman -S gvfs-{afc,dnssd,goa,google,gphoto2,mtp,nfs,onedrive,smb,wsdd}
The first line here depends on the desktop environment you want to install. As you can see, the installation of these 3 DEs is complemented by a few typical software, like quodlibet (and its dependency python-pyinotify) for the music or claws-mail as a mail client.
To install XFCE, you must run:
sudo pacman -S xfce4 xfce4-goodies gvfs quodlibet python-pyinotify lightdm-gtk-greeter xarchiver claws-mail galculator atril ffmpegthumbnailer pavucontrol pulseaudio-{alsa,bluetooth} network-manager-applet system-config-printer simple-scan
For MATE:
sudo pacman -S mate mate-extra lightdm-gtk-greeter celluloid quodlibet python-pyinotify claws-mail ffmpegthumbnailer pulseaudio-{alsa,bluetooth} blueman network-manager-applet system-config-printer simple-scan
And finally, for Cinnamon:
sudo pacman -S cinnamon cinnamon-translations gnome-{screenshot,calculator,extra} xreader lightdm-gtk-greeter shotwell rhythmbox celluloid blueman system-config-printer simple-scan
If you want to customize your LightDM:
sudo pacman -S lightdm-gtk-greeter-settings
To launch the environment, we must run first:
sudo systemctl start accounts-daemon > *Only if you are using MATE*

        sudo systemctl start lightdm
If everything goes well, we can use:
sudo systemctl enable accounts-daemon > *Only if you are using MATE*

        sudo systemctl enable lightdm
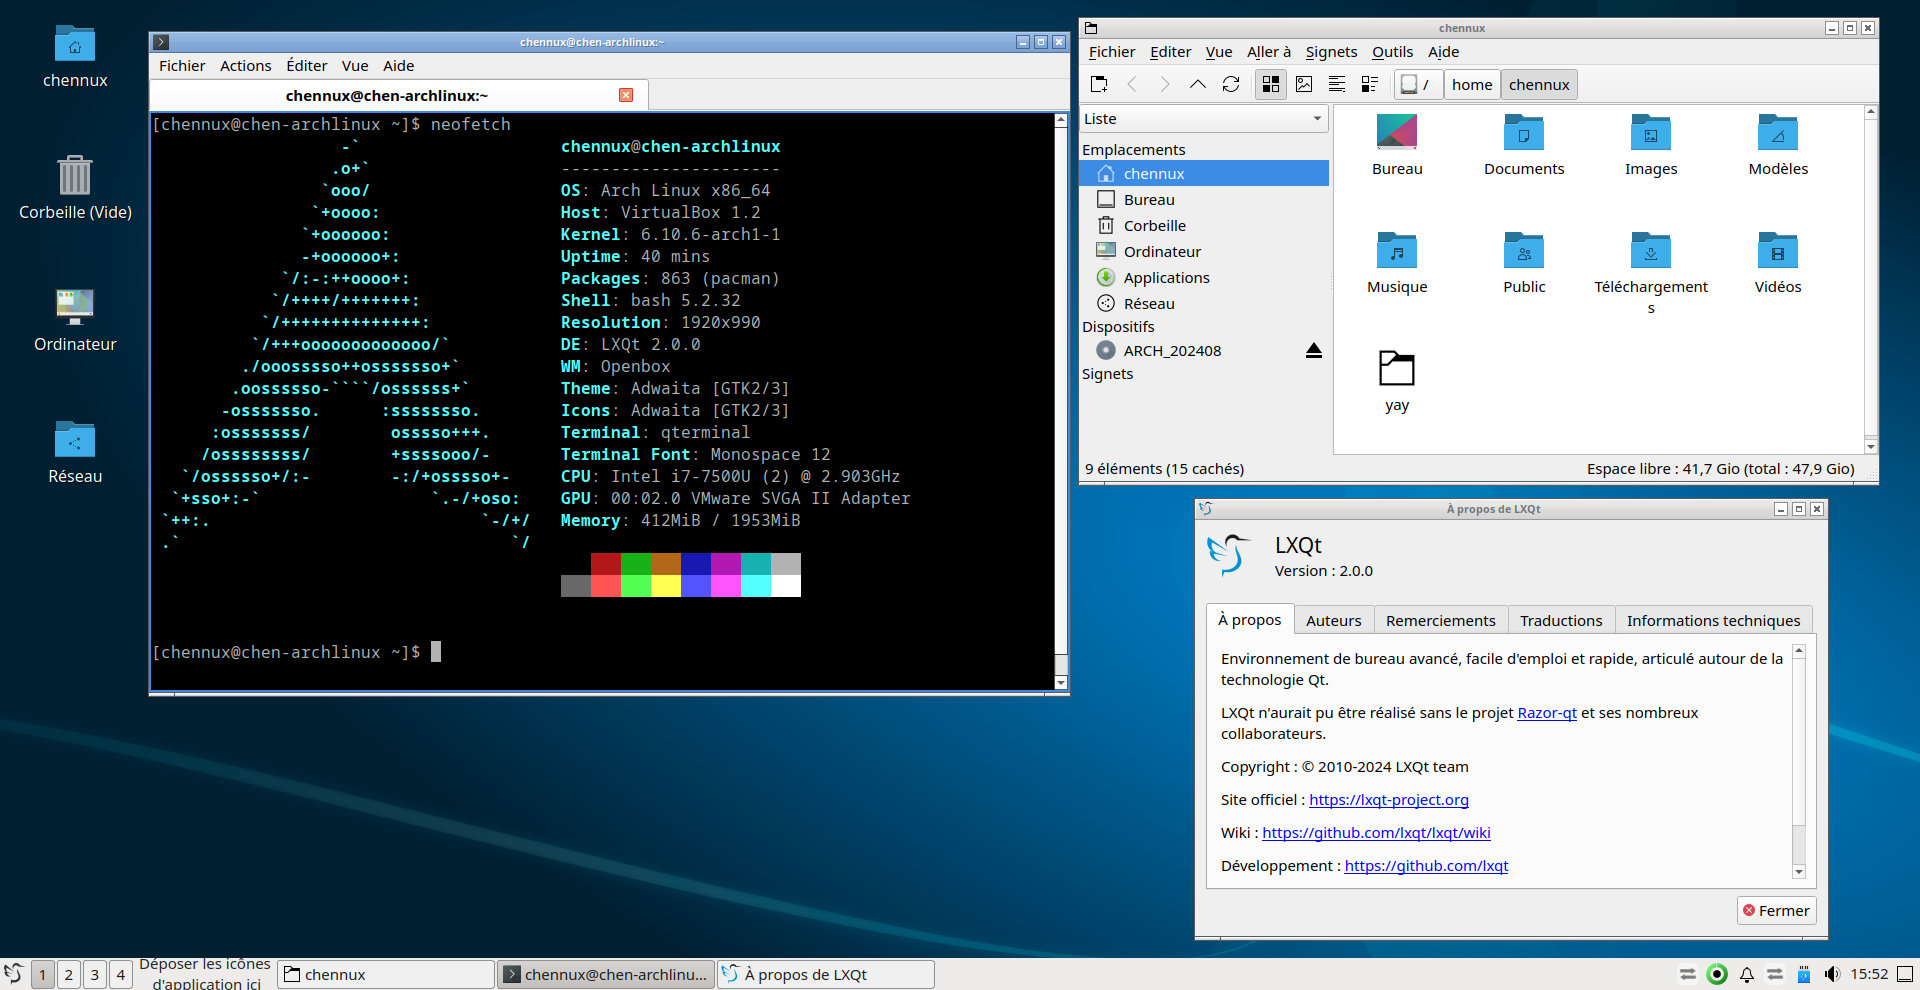
In this new version of the tutorial, I decided to keep only LXQt, LXDE being phased out progressively.
Note: Here, to install the qpdfview PDF reader and the nm-tray NetworkManager applet, using paru (or any other AUR helper) is required.
Note 2: If you need to manage devices using MTP (Android tablets for example), you need to add both the gvfs-mtp and the mtpfs packages. If you want all of the gvfs plugins (thanks to SuperMarioS for the command line):
paru -S gvfs-{afc,dnssd,goa,google,gphoto2,mtp,nfs,onedrive,smb,wsdd}
Like for the installation of XFCE or MATE, I added a few typical software. You can replace Claws-mail with Mozilla Thunderbird for example. Xterm is installed, because it is required to make the sound level control applet work.
To install LXQt:
paru -S lxqt breeze-icons sddm vlc qmmp xscreensaver libstatgrab lm_sensors claws-mail pulseaudio-alsa featherpad qpdfview nm-tray system-config-printer skanlite
To launch LXQt, we must run first:
sydo systemctl start sddm
If everything goes well, we can use:
sudo systemctl enable sddm
Here we go, the guide is now over. However, I did not cover the installation of a firewall. It's something more technical.
Above all, I wanted to make a quick guide, to show that in a small hour we can have an installed and pretty complete environment.
Have a nice discovery!